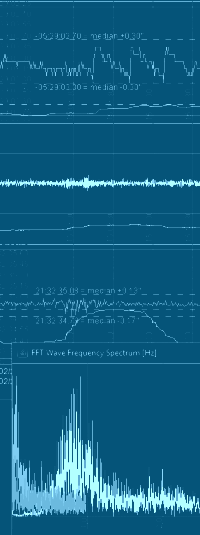
ASCOM Environment SafetyMonitor Driver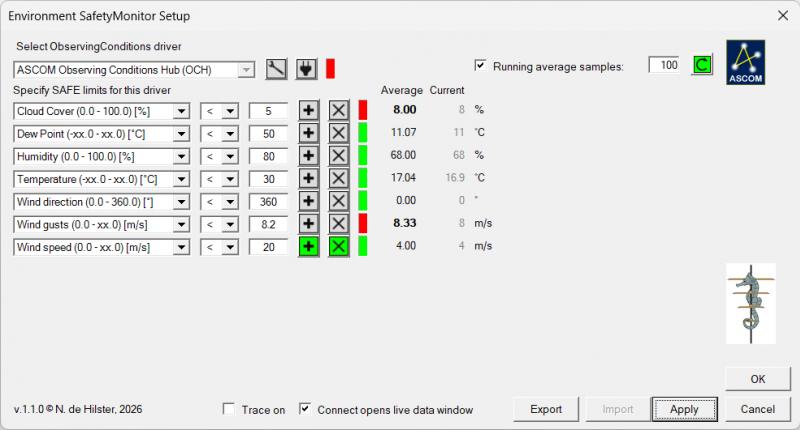 Figure 1: The Environment SafetyMonitor showing two UNSAFE observations (generated using random values). In order to be able to respond to an unwanted change in weather conditions I decided, encouraged by a befriended amateur-astronomer, to create this Environment SafetyMonitor, which creates a bridge between ObservationConditions (the environment) Drivers and the Safety-input of astronomical software.1 The driver passed Conform and thus is ASCOM-compatible (validation file in included in the download). Version 1.1.0 can be downloaded from my server: EnvironmentSafetyMonitorSetup.zip. The Environment SafetyMonitor is meant to be used in combination with the Observation Conditions Hub (OCH), which is an integral part of ASCOM and by default installed with it (i.e. if you have installed ASCOM, the OCH is installed as well and can directly be selected). It can as well be used with any other dedicated ObservationConditions driver. Set-up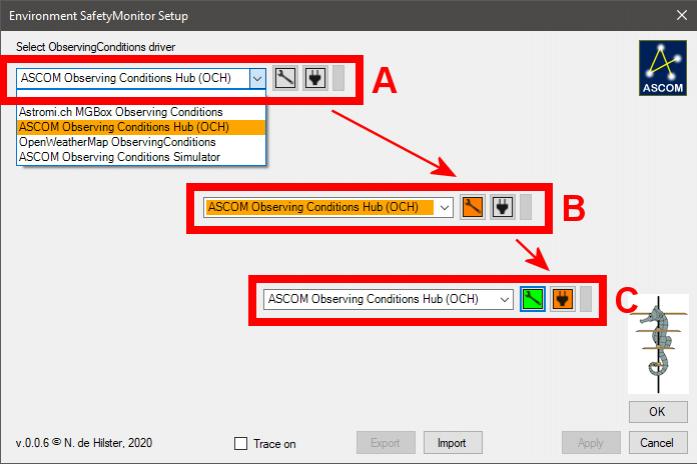 Figure 2: The first run of the Environment SafetyMonitor Driver. When first started the Environment SafetyMonitor starts with an almost empty screen (see figure 1). By clicking on the pull-down list, an ObservationConditions Driver (e.g. the OCH) can be selected (see figure 1A). Once a selection has been made the Set-up-button will be enabled allowing to set-up the selected ObservationConditions Driver (see figure 1B). This step has to be done at this moment in order to continue. After the set-up has been finished, the Connect-button will be enabled (see figure 1C). Once connected the settings for this SafetyMonitor can be made (see figure 2). 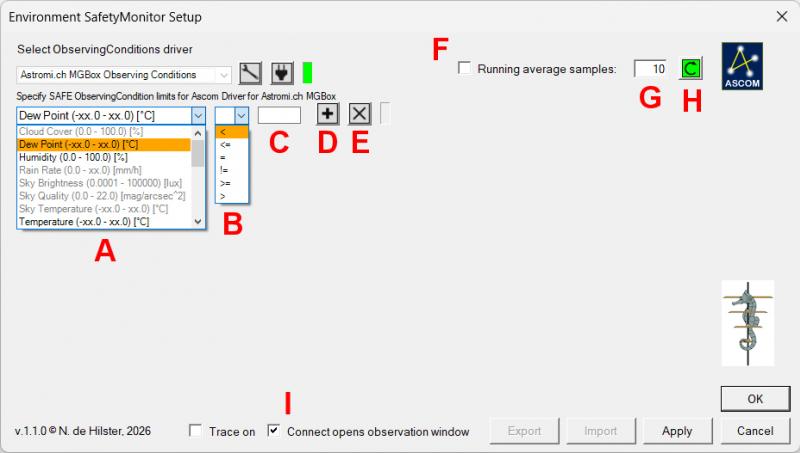 Figure 3: Entering the first settings for the Environment SafetyMonitor. Once connection with the ObservationConditions Driver is made the first settings-row is presented (see figure 3), allowing to add the first rule to the SafetyMonitor. - At A (see figure 3) the observation-type is selected. Only observation-types that are supported by the ObservationConditions Driver are accessible and therefore shown in black, the ones that are not available are shown in grey and cannot be selected. - At B the operator (<, <=, =, !=, >=, >) can be selected. - At C the criterion for the operator is entered (i.e the numerical value at which the SafetyMonitor should be trigered). Once all three fields have been filled, the Add-button (at D) is enabled (to add a new observation rule), while this is done with the Delete-button (E) as soon as the second rule has been defined. At this moment the rules are not yet parsed on to the driver, this is achieved by clicking OK. New in version 1.x.x are the options to select (at F) and define a Running Average of n samples (at G) and to reset it in case the sensor returns faulty data at first connection (button H). The Running Average waits 30 seconds before actually starting as some sensors do submit spikes during first connection. Another new feature in version 1.x.x is the option to open a live data view window upon connection (select at I). This option allows to see incoming data, add/remove rules, and change parameters. All these changes will not affect the safe/unsafe state until the Apply or OK buttons have been pressed. Run-time set-up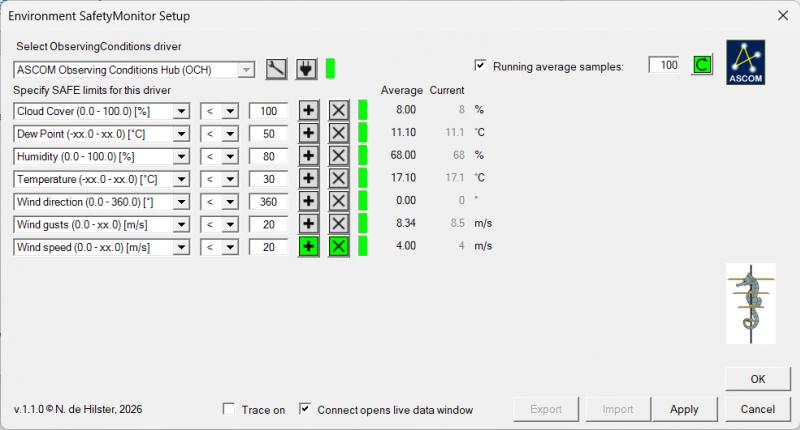 Figure 4: The set-up dialog during run-time, showing different average than direct values for wind gusts. Once the Environment SafetyMonitor is set-up and the option to option Connect opens observation window selected, pressing the OK-button will close the set-up window. When the driver is connected the set-up dialog opens to show the current state of the SafetyMonitor (see figure 4). At the left hand side of all rows a status-LED shows in green if the selected condition is SAFE and red when UNSAFE. At the far right the current observation is shown. Apart from changing the observation driver, all options are fully functional here, allowing to change the set-up with live data. Any potential unsafe situation is indicated by a blinking orange/red LED, but only after pressing the Apply- or OK-buttons the new set-up will be used by the SafetyMonitor to pass on the safe/unsafe situation to the acquisition software. 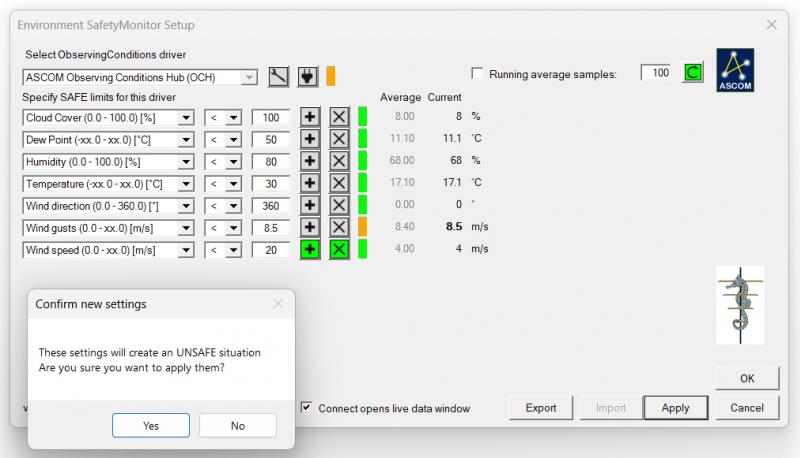 Figure 5: Applying an UNSAFE situation to the Environment SafetyMonitor. Pressing OK or Apply while the modified setting will cause an UNSAFE situation will cause a warning to pop-up, asking whether or not to accept these new settings (see figure 5). Once acknowledged, the SafetyMonitor will immediately fire an UNSAFE event. The settings for the SafetyMonitor can be exported and imported by clicking the respective button. The Import-button is only enabled when the SafetyMonitor is not connected. Changelogv.1.0.2 (14/06/2026): Added running averaging and the option to choose between running average and direct measurements. v.1.0.1 (08/06/2026): Improved alignment of first condition type row (lowered it by 4px). v.1.0.0 (07/06/2026): Option to open live data view window when connecting, and the possibility to have a running average over n samples. v.0.0.10 (31/12/2020): Fixed bug that kept timer alive after closing of the setup-dialog. v.0.0.1 (12/2020) - v.0.0.9: First development. Disclaimer[1]: This driver is freeware, it's use is at your own risk! I cannot be held responsible for any damage caused due to improper set-up or malfunctioning of the driver. If you have any questions and/or remarks please let me know. |
InFINNity Deck... Astrophotography... Astro-Software... Astro Reach-out... Equipment... White papers...
ASCOM Envir. SafetyMonitor ASCOM File SafetyMonitor ASCOM Generic UPS driver ASCOM IP SafetyMonitor ASCOM SafetyMonitor Hub Astronomical Twilight FITSalize Log10mGrabber MountCMD MountMonitor PySpectrometer3