
Double Pass Auto-Collimation (DPAC) Figure 1: The DPAC set-up for Ronchi and Foucault testing schematically explained. When I made my Foucault-test and Ronchi-test set-ups, I soon realised that these had serious limitations. First of all they were both single-pass, while the Ronchi-test required a real star (thus clear sky) with a very stable atmosphere or an artificial one, preferably in a Collimator. In addition, being single-pass set-ups, their sensitivity was rather low. The problem of the collimator was soon solved by building one from a 12" Newton, using a 9μ fibre-optic cable fed with LED light as a light source. Despite that the set-up was still single-pass, while collimating RitcheyChrétien (RC) telescopes required proper alignment of the optical axis of the RC and Newton to avoid the central obstruction of the Newton to affect collimation. Ronchi- and Foucault-test This all could be avoided when using a Double Pass Auto-Collimation (DPAC) set-up. In figure 1 the DPAC set-up for the Foucault and Ronchi set-ups is shown. The central square houses a beamsplitter, for which I decided to use a pellicle version instead of a glass cube beamsplitter (on hindsight a poor choice as I will explain below). Pellicle beamsplitters have the advantage of being very thin and therefore lacking ghost images, while the absence of the glass cube surfaces avoids reflections from them. Light from a three colour switchable LED enters the beamsplitter from above and is diffused by a diffuser before it hits the beamsplitter. The pellicle deflects 50% of the light to the left (the other 50% goes straight through and is lost) where it passes the Ronchi-grating (or knife-edge in case of the Foucault test).  Figure 2: The DPAC set-up for star-testing schematically explained. It then passes the optical system that needs testing (in this case a biconvex lens). The DPAC set-up is in the focal point of that optical system, which causes the light to be collimated before it hits the first surface optical plat mirror at the left (please note that when testing plano-convex lenses that the convex side should be facing the optical flat mirror). The mirror reflects the light in opposite direction, after which it passes the optical system under test again. It then arrives at the beamsplitter where 50% of the light is deflected towards the lamp and gets lost, while the remaining light (25% of the initial flux) passes straight through towards a camera at the right. For the Ronchi- and Foucault-test this camera needs to be equipped with a lens and focused to infinity (see figure 1). Star-test The set-up can also be used for star-testing (see diagram in figure 2), in which case the lens is removed from the camera and the LED is replaced by a fibre-optic artificial star. The diffuser and Ronchi-grating (or knife edge) are removed and the set-up is focused until a sharp image of the artificial star is found (please note that when testing plano-convex lenses that the convex side should be facing the optical flat mirror). For the star test the reflecting surface of the beamsplitter should be very flat, something the pellicle turned out not to be. As a result the beamsplitter produced an astigmatic image, so in the end I decided to replace it with a glass cubic beamsplitter.  Figure 3: The modified Vixen flip-mirror. As a basis for my DPAC set-up I decided to use a Vixen flip-mirror that I had laying around (see figure 3). The mirror, knob and spring were removed. The 2" nose-cone was replaced by a aluminium plate in which T2-thread was made to attach a 1¼" nose cone, so that the unit can be used for focusers of that size as well. Initially the internal mirror was replaced by an aluminium plate in which a 35mm opening was made to receive the 1¼" pellicle beam splitter (see figure 5 and figure 10). The beam splitter is attached with two brass brackets (see figure 10) which are made to have the surface of the beamsplitter in line with the 45 degrees line through the hinge of the original flip-mirror (see figure 11). The advantage of this is that the reflected light neatly originates from the centre of the pellicle and that the pellicle itself, which is a 2μm thin and therefore very fragile membrane, is reasonably well protected from both sides. The first star-test, however, showed that the pellicle was not entirely flat and as a result introduced astigmatism in the image. That this originated from the pellicle was easily tested by rotating the DPAC-unit in the focuser of the telescope under test. Had the astigmatism been caused by the scope the direction of the astigmatism should rotate in the recorded data, but as it remained stationary on the computer screen while rotating the astigmatism had to originate from within the DPAC unit. As rotating the fibre-optic artificial star did not have an effect, the only culprit left was the pellicle beamsplitter.  Figure 4: The 25mm non-polarizing AR-coated glass cubic beamsplitter mounted in the DPAC unit. I then ordered a 25mm non-polarizing and anti-reflecting (AR) coated glass cubic beamsplitter from Bohr Optics Co. Ltd. Their service was great and shipment was swift. In order to be able to properly adjust the beamsplitter I created an aluminium mount with three degrees of freedom. In front of the cube-mount two screws allow to rotate in along the Z-axis, while the whole mount sits on a central 4mm ball bearing with three pull-screws that allow rotation along the X- and Y-axis. The star-test done with this beamsplitter also showed a little bit of astigmatism, but this time rotating the DPAC-unit showed that the astigmatism was in the scope. Downside of the glass cube when compared to the pellicle version, despite being AR-coated, are the reflections, but at the same time they can be used to properly align the cube with the optical axis. As can be seen in figure 13 the star-test results in four reflections when the scope is in focus. One of them (reflection A in the image) is fixed to the DPAC-unit and will only move when the orientation of the cube is changed by rotating the cube's mount. Using a digitally overlaid cross-hair it is fairly easy to properly align the cube. The other reflections are the artificial star as seen by the scope (B) and two reflections (C and D), which most likely are double and triple reflections on the AR-coated surfaces. Being rather faint reflections A, C and D soon disappear when defocussing.  Figure 5: The DPAC set-up ready for Foucault- and Ronchi-testing. figure 5 shows the DPAC-unit ready for the Foucault- and Ronchi-test. A ZWO ASI290MC camera equipped with either a 2.8-12mm, a 25mm or 35mm CS lens is inserted in the camera end of the DPAC-housing and fastened using an aluminium bracket (afocal imaging set-up). Focusing is done to infinity prior to mounting the camera. In the top 1¼ adapter an aluminium insert is placed that holds the RGB LED and two diffusing layers. In order to get a bit evenly illuminated image the LED was first chopped flat and sanded down to a matte finish. Then some 5mm in front of it a 0.3mm thin matte sanded plastic insert diffuses the light even further before hitting a 3mm thick and sanded perspex waver. An even better method would have been using a short focal length lens to produce a collimated beam of light, but that is for the next modification. For the Ronchi-test I created three grating holders that are equipped with 65, 100 and 133LPI (Lines Per Inch) gratings. The gratings are supplied as a pdf-file by Asif Khan on his website and printed on film by a Dutch printing house on a 2400dpi printer.  Figure 6: The front of the DPAC-unit with the nose-cone removed to show the Ronchi- and Foucault-inserts. The grating holders can be inserted from below in the DPAC-unit and fastened with a single M4 screw. Adjacent figure shows the front of the DPAC unit with the nose-cone removed to show how the grating is inserted (in this case a 133LPI grating). The gratings can be replaced without removing the nose-cone. The insert at the upper-left shows the opening in which the holders are inserted, the insert at the upper-right shows the 65LPI grating next to the knife-holder for the Foucault test. The Foucault-insert can be moved sideways to get the optimal position for the knife-edge test. When using the DPAC for Ronchi- and Foucault-tests some reflection of light from the rear of the Ronchi-grating and Foucault-knife as well as from the lens surface occur. These reflections can easily be removed by taking darks. In order to remove all reflections the darks are taken by blocking the light between the optical system under test and optical flat mirror.  Figure 7: The DPAC set-up ready for star-testing. When used for start-testing the LED-holder is replaced by an adapter that receives the 9μm fibre-optic cable, and the diffuser is removed. The other end of the cable is illuminated by a RGB LED. The fibre-optic adapter is made to have the end of the cable at the same distance from the objective as the camera. The rear of the unit has a T2 to 2" adapter to hold the camera, which now is used without CS-lens (focal imaging set-up). The following video shows what the star-test looks like:  Figure 8: Complete DPAC analysis of the intentionally badly figured lens of the GTT60. With the DPAC-unit finished I undertook a complete analysis of the lens in my GTT60, which was intentionally made with a poor figure and ditto polishing. Adjacent image shows the lens in red, green and blue and in a synthetic full-colour rendering made from the RGB recordings (for another example see figure 19). The top row shows the results of the Foucault test. Clearly a central region can be discerned as well as surface roughness. The second row shows the Ronchi-test with a 133LPI grating. All images where taken at the same focal distance from the lens and again clearly show the central poor region. The third row shows the star-test at full 60mm aperture (convex side towards the optical flat). The poor figure of the lens clearly results in a poor star-test. The RGB-images were all taken at best focus, defined by the distance at which the recorded peak intensity reached it maximum. The synthetic full-colour image therefore is incorrect as the focus positions for R, G, and B span a few centimetres and neither of them will thus be in focus at the same time. The bottom row finally shows what happens when the objective is stopped down to 30mm. The star-test now is quite reasonable. Again the synthetic full-colour image is incorrect as the separate colours were again captured at their best focus. If you have any questions and/or remarks please let me know. |


 Figure 11: The pellicle holder with pellicle beamsplitter that replaces the original Vixen mirror (side). |
 Figure 12: The improved DPAC unit with an adjustable glass cube beamsplitter. |
 Figure 13: The view through the cubic beamsplitter during star-test at focus. |
 Figure 14: The top of the DPAC-unit removed to show the perspex diffuser. |
 Figure 15: The new 1¼ nose-cone (left) and the original 2" version. |
 Figure 16: The Ronchi-grating holder in parts. |
 Figure 17: The Vixen flip-mirror parts that were removed for the modification. |
 Figure 18: The DPAC-unit with inserts and fibre-optic (left) and LED light-sources. |
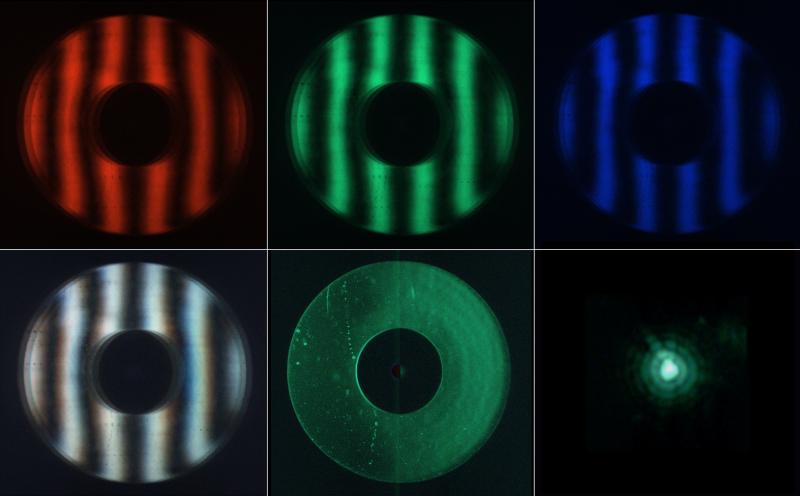 Figure 19: Full DPAC test of a 10 inch Meade LX200 GPS Schmidt-Cassegrain telescope. |
InFINNity Deck... Astrophotography... Astro-Software... Astro Reach-out... Equipment... White papers...
Telescopes... SHG700 Spectroscope 10Micron GM3000HPS Test tools... Sundials...
Bath-interferometer Collimator DPAC Filter test-bench Foucault-test Ronchi-test